

Ordering Business Cards
Whether ordering for yourself or on behalf of someone else, we've made ordering business cards easy and stress free!
(Business Cards are typically for School Leaders and Remote Staff only)
Guidepost Montessori cards are customized in Canva and ordered through zazzle.com!
For more information on logging into our shared Canva account to access all the pro features, head to this link.
For PMI business cards keep scrolling past this section and find our instructions when working with Air.
______
First, you’ll want to head over to Canva and edit the business card template. Link here.
Double click the text boxes to edit the information in each field.
Be sure to keep the margin lines in tact and to not go beyond them to ensure nothing gets cut off when printing.


To customize the QR code on the back of the card, on the left side panel, click ELEMENTS and type in "QR Code Generator"

You'll see the QR Generator app come up. Click 'USE APP'

Next, you'll want to get the URL to your school location's page.
So an example is: https://www.guidepostmontessori.com/schools/deerbrook-deerfield-il
You'll paste that into URL box and hit 'GENERATE CODE'

You'll notice that it places the QR Code in the center of the card so we'll want to size the QR Code down a bit, delete the placeholder, and move it to where the placeholder was.

To elevate the look of the QR Code, we'll want to curve the corners to help it fit more into our brand. To do that, you'll want to head to the 'BORDER STYLE' button in the top panel and give the corner roundness a value of 5.

Now we have our information filled out in the front, QR Code made, placed, corners rounded, and the card is ready to go to Zazzle.
In the upper right corner, click 'SHARE' then 'DOWNLOAD'

Under 'FILE TYPE' click 'PDF PRINT'

By default, Canva will want you to download both the front and back sides as one single PDF but unfortunately Zazzle cannot read multiple page PDFs so we'll need to download each side separately.
So uncheck 'ALL PAGES (1-2)' and just select 'PAGE 1'
You'll want to repeat this step for Page 2 as well.

Under 'COLOR PROFILE' click 'CMYK (BEST FOR PROFESSIONAL PRINTING)'

Click 'DOWNLOAD' and save the PDFs on your computer.
Now we head to Zazzle to upload and order our business card.
Click 'VIEW PRODUCT DETAILS'

Next, make sure the card is set to 'STANDARD 3.5x2'
Choose rounded corners to make it more on brand.
Choose the quantity you need.
Click 'CUSTOMIZE THIS DESIGN'

You'll want to head to the 'UPLOAD' section and pick both the front and back of the card.

Drag the front of the card to the workspace. Make sure all the copy and design fits within the margins.
Once that's placed in, click the little button that says 'FRONT' and choose back. Place the back of the card in the workspace.

Once the front and back are in place, in the upper right corner click "DONE'
You'll be brought to a page to see a sample of what your card will look like. If everything looks good, click "ADD TO CART' and simply follow the checkout procedure.
___________________________________________
HERE ARE THE INSTRUCTIONS FOR CARDS STILL USING MEDIAVALET:
CLICK HERE FOR A VIDEO TUTORIAL
1. Choose your template in MediaValet:
2. Select More ->Select "Edit in Print UI"

3. Fill in your information on the contact side. Once complete click "Done"

4. Download as a PDF ONLY (you will lose the contact side if downloaded as JPG or PNG)

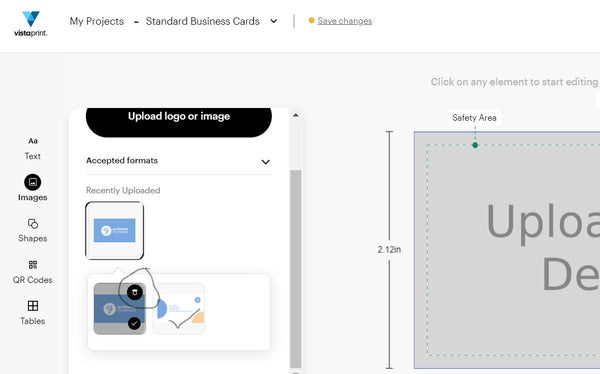
5. Go to VistaPrint.com for Business Cards and select "Upload your design" and select Horizontal, Standard.

6. Upload the file by selecting "Images," then "Upload logo or image" and upload the pdf file saved from MediaValet.

Make sure that the color is "flush" on the edges. Use the warning signs on the border as a guide to expand the image to fit.

7. Click "Add the back" (the $8 upcharge is approved) and "Select Upload your design."

8. Select the image under "Recently Uploaded," trash the front image and then select the back image.
9. Click Next in the upper right corner of the webpage, and review and approve.
10. Select Standard for Paper Thickness, Matte for Paper Stock, None for Finish, and Standard for Corners. Select the desired quantity, and add to cart.
11. Create an account or continue as a guest. Checkout with your shipping and payment information. The total should be around $25 before tax and shipping.
You can use your company card or personal card, make sure to save your receipt to expense through Expensify (submit a ticket to accounting if you need to set up an account)
If you have any questions about VistaPrint or need to reach out to customer service go to https://www.vistaprint.com/customer-care/help-center.
Still have questions? Submit a ticket here to Marketing